MINION BIRTHDAY PARTY (PART 1) & DIY MINION PINATA
19.5.15Ένα από τα "καλά" του να έχεις παιδιά είναι τα παιδικά πάρτι. Όταν δε τα παιδιά είναι μικρά οι απαιτήσεις τους είναι περιορισμένες (λέμε τώρα!). Έτσι λοιπόν, φέτος αποφασίσαμε (εγώ δηλαδή!) ότι θα κάναμε το πάρτι γενεθλίων του μικρού μας στο σπίτι. Του το οφείλαμε άλλωστε από πέρσι που δεν κάναμε τίποτα ιδιαίτερο. Οι τύψεις της μάνας!
Το θέμα ήταν αποφασισμένο άλλωστε καθώς οι ταινίες "Εγώ ο Απαισιώτατος" 1 & 2 είναι οι αγαπημένες μας τον τελευταίο καιρό. Έτσι λοιπόν στρώθηκα στην δουλειά και άρχισα την οργάνωση του πάρτι. Βρήκα πάρα πολλές ιδέες και μπορώ να πω ότι ενθουσιάστηκα αρκετά αλλά τις περιόρισα όσα μπορούσα λόγω χρόνου (μπορείτε να δείτε όλες τις ιδέες εδώ).
Ξεκινήσαμε από τις προσκλήσεις τις οποίες τις έφτιαξα στο MS Publisher και τις στείλαμε με e-mail. Εδώ πρέπει να σας πω ότι παρόλο που ο μικρός πηγαίνει στον παιδικό επιλέξαμε να μην καλέσουμε κανένα παιδάκι από το σχολείο διότι λόγω χώρου δεν θα μπορούσαμε να τα καλέσουμε όλα και το να κάνεις διαχωρισμό στους συμμαθητές των παιδιών σου είναι πολύ άσχημο. Άλλωστε, όλοι οι φίλοι μας έχουν παιδάκια οπότε ήταν μια καλή ευκαιρία γι' αυτά να έρθουν κοντά και για μας να τα πούμε λιγάκι μιας και ο χειμώνας ήταν μεγάλος φέτος και οι ιώσεις πολλές.
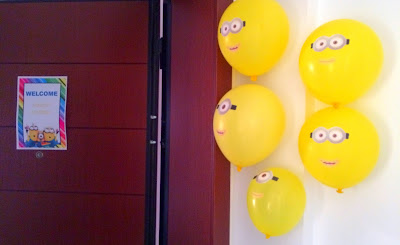
Στο Publisher έφτιαξα επίσης την πινακίδα που στόλιζε την εξώπορτα και καλωσόριζε τους καλεσμένους. Βρήκα επίσης μάτια και στόμα Minion και αφού τα εκτύπωσα σε αυτοκόλλητο χαρτί, τα έκοψα και τα κόλλησα σε κίτρινα μπαλόνια.
Το banner το ανακάλυψα εδώ όπου υπάρχουν και ξεχωριστά όλα τα γράμματα για να γράψεις αυτό που θέλεις (στα αγγλικά βέβαια).
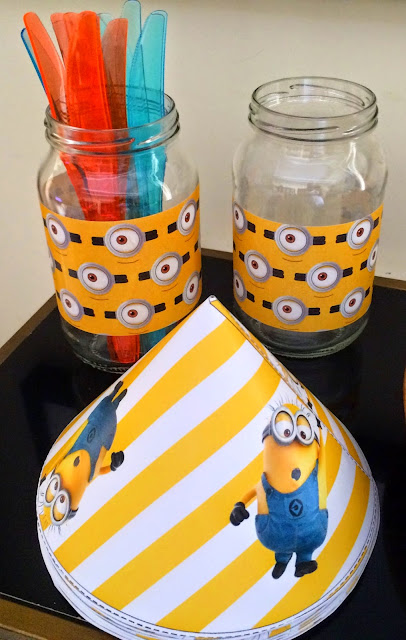
Τύπωσα καπελάκια (τα οποία βρήκα εδώ) και τα χρησιμοποιήσαμε ως χωνάκια για τα πατατάκια και τα γλυκάκια μας. Εκτύπωσα digital scrapbooking χαρτί σε αυτοκόλλητο, το έκοψα και το κόλλησα σε γυάλινα βάζα όπου μέσα έβαλα τα μαχαιροπίρουνα.
Επίσης τύπωσα καρτελάκια τα οποία τα κόλλησα με ταινία διπλής όψης σε οδοντογλυφίδες και διακόσμησα τα φαγητά μας. Είχα εκτυπώσει επίσης και καρτελάκια με τα φαγητά αλλά ξέχασα να τα χρησιμοποιήσω.
Για τα δωράκια των παιδιών (δυστυχώς ξέχασα να τα βγάλω φωτογραφία) είχαμε σακουλάκια με μπλέ και ρόζ σετ ζωγραφικής, Minion χρωμοσελίδες και mini Smarties.
Το highlight της βραδιάς ήταν το σπάσιμο της Minion piñata, την οποία την έφτιαξα με τα χεράκια μου. Μια εβδομάδα κάθε βράδυ, αφού έβαζα την μικρή για ύπνο κόλλαγα εφημερίδες. Δεν είχα ξαναφτιάξει piñata αλλά νομίζω ότι για πρώτη φορά τα πήγα καλά. Τα χαμόγελα και το πάθος των παιδιών ήταν η καλύτερη ανταμοιβή για τον κόπο μου.
Δείτε παρακάτω πως να φτιάξετε και εσείς την δική σας piñata.
MINION PINATA
ΥΛΙΚΑ
2 μπαλόνια
χαρτόνι
αυτοκόλλητη ταινία
αλεύρι
νερό
εφημερίδες κομμένες σε λωρίδες
πινέλο
σχοινί
κοπίδι
κίτρινο χαρτί γκοφρέ
κόλλα
Minion μάτι (εγώ χρησιμοποίησα αυτό)
ΕΚΤΕΛΕΣΗ
1. Φουσκώνουμε τα δύο μπαλόνια και τα δένουμε μεταξύ τους. Στην συνέχεια τυλίγουμε το χαρτόνι γύρω από αυτά και το στερεώνουμε με αυτοκόλλητη ταινία.
2. Ετοιμάζουμε την αλευρόκολλα. Σε ένα μπολ αναμειγνύουμε 2 φλ. νερό με 2 1/2 φλ. αλεύρι για όλες τις χρήσεις. Ανακατεύουμε καλά να μην έχει σβόλους και το αφήνουμε στο ψυγείο για 30 λεπτά να "ξεκουραστεί".
3. Στην συνέχεια στερεώνουμε την κατασκευή μας σε ένα μπολ και ξεκινάμε να κολλάμε τις εφημερίδες. Βουτάμε τις λωρίδες της εφημερίδας στην αλευρόκολλα, τις στραγγίζουμε και τις κολλάμε πάνω στην κατασκευή μας, φροντίζοντας να μην τις υπερκαλύπτουμε. Αφού καλύψουμε όλη την κατασκευή με εφημερίδες την αφήνουμε να στεγνώσει καλά (προτιμότερο ολονυχτίς) και στην συνέχεια επαναλαμβάνουμε την διαδικασία. 2-3 στρώσεις εφημερίδας είναι αρκετές. Εγώ χρησιμοποίησα 3 στρώσεις και τα παιδιά δυσκολεύτηκαν αρκετά να την σπάσουν.
4. Όταν στεγνώσει η κατασκευή μας, σχεδιάζουμε ένα ορθογώνιο άνοιγμα (στο σημείο που θα κολλήσουμε το μάτι) και κόβουμε με κοπίδι τις 3 πλευρές του ώστε να σχηματίσουμε ένα παράθυρο.
5. Με το κοπίδι κάνουμε επίσης δύο τρύπες στο επάνω μέρος της πινιάτα αριστερά και δεξιά ώστε να περάσουμε το σχοινί που θα την κρεμάσουμε. Περνάμε το σχοινί προσεκτικά από τις τρύπες και ενώνουμε τα δύο άκρα εσωτερικά με κόμπο.
6. Γεμίζουμε την πινιάτα με γλυκάκια, προσέχοντας να μην την κάνουμε πολύ βαριά και κλείνουμε το "παράθυρο" με ταινία.
7. Στην συνέχεια κόβουμε λωρίδες από το γκοφρέ χαρτί, τις φρυζάρουμε και τις κολλάμε προσεκτικά πάνω στην πινιάτα με κόλλα ξεκινώντας από την βάση και ανεβαίνοντας προς τα πάνω.
Συνεχίζεται ...
One of the "good" things of having children is throwing kids birthday parties. When the kids are young their requests are limited. So for my son's 4th Birthday this year we (me, myself & I!) decided to have his party at home. We owned him since last year we did not do anything special. Mommy guilts!
Finding a theme was easy as the movies "Describable Me 1&2" are on rotation lately. So, I start planning the party. I found great ideas on Pinterest but I cut them down due to preparation time (you can find all my pins here).
I created the invitations using MS Publisher and e-mailed them. To this point I have to say that although our son goes to Day Care we decided not to invite any of this schoolmates as our house is not big enough to host all of them and having him to choose some of them is ugly. Besides, all our friends have kids with same ages and it would be a nice opportunity for them to play together and for us the parents to chat a bit after a long cold winter full of flues.
Using MS Publisher I created the Welcome Sign that we hang on the front door. I found also some Minion eyes and mouths free printable that I print on adhesive paper, cut with scissors and stick on yellow balloons.
I found here a printable banner with separate letters that we hang from the ceiling lights.
I also printed some party hats (found here) that we used as cones for our chips and candies. I found some digital scrapbooking paper that I printed on sticker paper.
I cut stripes and I adhere them onto plain jars to hold the cutlery.
I printed some tags and stick them with double sided tape on toothpicks to make some food tags (I had also printed some food tent cards for the buffet but I forgot to use them).
For the kids favors (unfortunately I forgot to take a photo) we had small bags with blue or pink painting sets, Minion coloring pages and mini Smarties.
The highlight of the evening was the breaking of the Minion piñata. It was a last minute request by the birthday boy. Every night for a week, after I put my baby girl into to sleep I was gluing newspapers onto balloons. I had not made a piñata before but it was an easy project. Time consuming but easy. The kids enjoyed it very much!
Here's how to make a Minion piñata.
MINION PINATA
MATERIALS
2 balloons
cardboard
adhesive tape
flour
water
newspapers cut into strips
brush
string
craft knife
yellow crepe paper
craft glue
Minion eye (I used this one)
DIRECTIONS
1. Inflate two balloons and tie them together. Then wrap cardboard around them and put adhesive tape to hold them together.
2. Prepare the flour-water glue. In a bowl mix 2 cups of water with 2 1/2 cups of flour. Mix well until combined and refrigerate for 30 minutes to "settle".
3. Then put the construction onto a bowl to have a steady base begin to glue the newspapers. Dip the strips in the flour-water glue, drain them and stick them on the balloons, making sure not to overlap a lot. When you have cover all the surface of the balloons let it dry thoroughly (preferably overnight) and then repeat the process. 2-3 layers of newspaper are enough. I used 3 layers and children had a hard time trying to break it.
4. Once it is dry, we draw a rectangular opening (where you will stick the eye) and cut its 3 sides with a craft knife to form a window.
5. With the craft knife make two holes at the sides of the piñata to put the hanging string. Pass carefully through the holes the rope and connect the two ends making a knot.
6. Fill in the piñata with candies but be careful not to make it too heavy. Close the "window" with adhesive tape.
7. Cut strips of crepe paper, fringe them and glue them carefully on the piñata starting from the base and moving upwards.
To be continue ...









0 σχόλια