


(scroll down for English)
Ορεκτικά/Appetizers
ΤΑΡΑΜΟΣΑΛΑΤΑ ΜΕ ΚΑΡΑΜEΛΩΜΕΝΑ ΚΡΕΜΜΥΔΙΑ // TARAMOSALATA (GREEK FISH ROE DIP) WITH CARAMELIZED ONIONS
15.2.18
(scroll down for English)

Τραγανός, υπέροχα σιροπιαστός και καρυδάτος. Αυτός είναι ο ιδανικός μπακλαβάς! Το παραδοσιακό γλυκό μας το οποίο αν και τελειοποιήθηκε στις κουζίνες του Τοπ Καπί στα χρόνια της Οθωμανικής Αυτοκρατορίας, έχει τις ρίζες του χιλιάδες χρόνια πριν, στην Αρχαία Ελλάδα. Θα τον συναντήσετε σε πολλές παραλλαγές εντός και εκτός ελληνικών συνόρων. Στην Κεντρική Ελλάδα για παράδειγμα τον φτιάχνουν είτε μόνο με αμύγδαλα είτε με καρύδια και αμύγδαλα ενώ στη γειτονική Τουρκία θα τον βρείτε με φιστίκια και σερβιρισμένο με καϊμάκι.
Ο μπακλαβάς είναι ο πρωταγωνιστής της κατηγορίας "Γλυκά Ταψιού/Σιροπιαστά" και ίσως το μοναδικό γλυκό που δίνει την ευκαιρία σε όλες τις γυναίκες της οικογένειας να συναντηθούν και να το προετοιμάσουν. Θυμάμαι, παλαιότερα περίπου τέτοιες ημέρες, πριν αρχίσουν οι κάθε είδους απώλειες, μαζεύονταν στην κουζίνα μας θείες και φίλες για να φτιάξουν τον μπακλαβά για τις γιορτές και όσο αυτός ψήνονταν, να πιουν το καφεδάκι τους και να ανταλλάξουν τα νέα τους. Αυτή η συνταγή λοιπόν είναι μια από τις οικογενειακές μας!
Πρόκειται για ένα απλό και εύκολο γλυκό, η παρασκευή του οποίου δεν θα πρέπει να σας τρομάζει. Η διαδικασία είναι ουσιαστικά πολύ απλή: λάδωμα-φύλλο-γέμιση-φυλλο κ.ο.κ. Δοκιμάστε το λοιπόν!

ΜΠΑΚΛΑΒΑΣ
12 άτομα
Προετοιμασία: 1 ώρα - Ψήσιμο: 2 έως 2 1/2 ώρες
ΥΛΙΚΑ
500 γρ. φύλλα κρούστας
400 γρ. βούτυρο, λιωμένο
1 κ.σ. γεμάτη, κανέλα τριμμένη
1 κ.γ. κοφτό, γαρύφαλλο τριμμένο
400 γρ. καρύδια (ή 200 γρ. καρύδια και 200 γρ. αμύγδαλα)
50 γρ. τριμμένη φρυγανιά
400 γρ. βούτυρο, λιωμένο
1 κ.σ. γεμάτη, κανέλα τριμμένη
1 κ.γ. κοφτό, γαρύφαλλο τριμμένο
400 γρ. καρύδια (ή 200 γρ. καρύδια και 200 γρ. αμύγδαλα)
50 γρ. τριμμένη φρυγανιά
Για το σιρόπι
600 γρ. ζάχαρη
400 ml νερό
60 γρ. γλυκόζη
1 ξύλο κανέλας
3 ολόκληρα γαρύφαλλα
1 πορτοκάλι κομμένο στη μέση
ΕΚΤΕΛΕΣΗ
Ετοιμάζουμε
πρώτα το σιρόπι. Σε μία κατσαρόλα σε δυνατή φωτιά, βάζουμε τη ζάχαρη,
το νερό, τη γλυκόζη, 1 ξύλο κανέλας, τα γαρύφαλλα και το κομμένο
πορτοκάλι. Μόλις πάρει μία βράση, λιώσει η ζάχαρη και γίνει το σιρόπι
διαφανές, αποσύρουμε από τη φωτιά και το αφήνουμε να κρυώσει.
Στη συνέχεια ετοιμάζουμε τη γέμιση. Βάζουμε στο μούλτι σε δόσεις τα καρύδια, την κανέλα, τη φρυγανιά και το γαρύφαλλο και τα ψιλοκόβουμε χωρίς όμως να τα κάνουμε σκόνη. Ρίχνουμε το μείγμα σε ένα μπολ και ανακατεύουμε με ένα κουτάλι.

Προθερμαίνουμε το φούρνο στους 150οC. Με ένα πινέλο βουτυρώνουμε πολύ καλά ένα ταψί 35x25 εκ. περίπου και το τοποθετούμε με τη μεγάλη του πλευρά παράλληλη προς το μέρος μας. Ξεκινάμε να απλώνουμε τα φύλλα, φτιάχνοντας τη βάση. Απλώνουμε προσεχτικά το πρώτο φύλλο κρούστας, με τη μεγάλη του πλευρά, να καλύπτει τα 2/3 της επιφάνειας του ταψιού και αφήνουμε τις άκρες του φύλλου να προεξέχουν από τις πλευρές του ταψιού. Πιέζουμε με το χέρι μας ελαφρά ώστε να στρώσει καλά το φύλλο στις γωνίες του ταψιού.
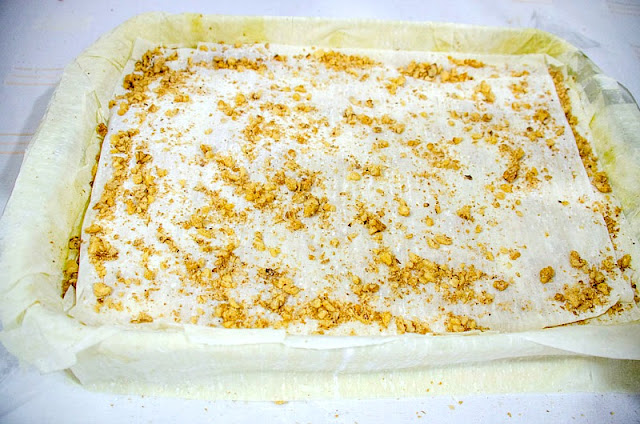
Επαναλαμβάνουμε τη διαδικασία με το δεύτερο
φύλλο, αλλά αυτή τη φορά το στρώνουμε από την άλλη πλευρά του ταψιού και
να επικαλύπτει ελαφρά το πρώτο φύλλο (σταυρωτά). Ραντίζουμε τα φύλλα, ΧΩΡΙΣ να ακουμπάει το πινέλο το φύλλο,
με λιωμένο βούτυρο. Έπειτα, απλώνουμε το τρίτο φύλλο κατά μήκος όλης
της επιφάνειας του ταψιού, στρώνοντας πάλι το φύλλο στις γωνίες όπως και
προηγουμένως. Βουτυρώνουμε με τον ίδιο τρόπο. Απλώνουμε 1 χούφτα από τη
γέμιση σε όλη την επιφάνεια του ταψιού. Απλώνουμε ένα φύλλο ακόμα,
βάζοντας τη μικρή του πλευρά να εφάπτεται στην πάνω μεγάλη πλευρά του
ταψιού. Βουτυρώνουμε με τον ίδιο τρόπο. Απλώνουμε 1 χούφτα γέμιση σε όλη
την επιφάνεια του ταψιού. Απλώνουμε ένα φύλλο ακόμα και βουτυρώνουμε
και προσθέτουμε γέμιση με την ίδια διαδικασία.
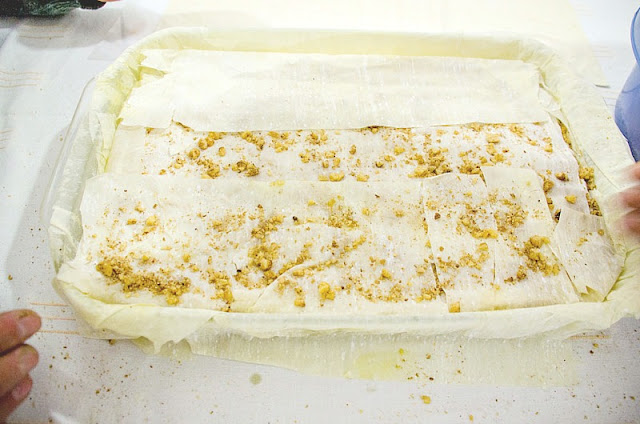
Επαναλαμβάνουμε τη
διαδικασία γέμιση, φύλλο, βούτυρο διαδοχικά, για τα υπόλοιπα φύλλα
αφήνοντας 3 για το τέλος, φροντίζοντας να χρησιμοποιήσουμε όλη η γέμιση.
Γυρνάμε τις άκρες των φύλλων προς τα μέσα και πατάμε καλά. Στη
συνέχεια, βάζουμε ακόμα 2 φύλλα, χωρίς γέμιση, βουτυρώνοντας το κάθε ένα
όπως πριν. Βάζουμε το τελευταίο φύλλο και περιμετρικά πατάμε και
γυρνάμε τις άκρες προς τα μέσα με τη βοήθεια του πινέλου. Ρίχνουμε από
πάνω το υπόλοιπο βούτυρο που μας έχει περισσέψει.

Βάζουμε στο ψυγείο για 10-15 λεπτά να κρυώσει το βούτυρο ώστε να μπορέσουμε να χαράξουμε τον μπακλαβά μας. Χαράζουμε το μπακλαβά με ένα κοφτερό μαχαίρι αλλά όχι μέχρι κάτω. Ψήνουμε σε προθερμασμένο φούρνο 2 έως 2,5 ώρες μέχρι να γίνει τραγανός.

Όταν ψηθεί ο μπακλαβάς, όσο είναι ακόμα καυτός το σιροπιάζουμε με το κρύο σιρόπι. Αφήνουμε να κρυώσει και να τραβήξει το σιρόπι (ιδανικά όλο το βράδυ). Αφού κρυώσει εντελώς, κόβουμε και σερβίρουμε.
Στη συνέχεια ετοιμάζουμε τη γέμιση. Βάζουμε στο μούλτι σε δόσεις τα καρύδια, την κανέλα, τη φρυγανιά και το γαρύφαλλο και τα ψιλοκόβουμε χωρίς όμως να τα κάνουμε σκόνη. Ρίχνουμε το μείγμα σε ένα μπολ και ανακατεύουμε με ένα κουτάλι.

Προθερμαίνουμε το φούρνο στους 150οC. Με ένα πινέλο βουτυρώνουμε πολύ καλά ένα ταψί 35x25 εκ. περίπου και το τοποθετούμε με τη μεγάλη του πλευρά παράλληλη προς το μέρος μας. Ξεκινάμε να απλώνουμε τα φύλλα, φτιάχνοντας τη βάση. Απλώνουμε προσεχτικά το πρώτο φύλλο κρούστας, με τη μεγάλη του πλευρά, να καλύπτει τα 2/3 της επιφάνειας του ταψιού και αφήνουμε τις άκρες του φύλλου να προεξέχουν από τις πλευρές του ταψιού. Πιέζουμε με το χέρι μας ελαφρά ώστε να στρώσει καλά το φύλλο στις γωνίες του ταψιού.


Βάζουμε στο ψυγείο για 10-15 λεπτά να κρυώσει το βούτυρο ώστε να μπορέσουμε να χαράξουμε τον μπακλαβά μας. Χαράζουμε το μπακλαβά με ένα κοφτερό μαχαίρι αλλά όχι μέχρι κάτω. Ψήνουμε σε προθερμασμένο φούρνο 2 έως 2,5 ώρες μέχρι να γίνει τραγανός.

Όταν ψηθεί ο μπακλαβάς, όσο είναι ακόμα καυτός το σιροπιάζουμε με το κρύο σιρόπι. Αφήνουμε να κρυώσει και να τραβήξει το σιρόπι (ιδανικά όλο το βράδυ). Αφού κρυώσει εντελώς, κόβουμε και σερβίρουμε.

Crispy, nutty and extra syrupy! Baklava is a delicious traditional dessert made of layers of crispy golden brown phyllo, filled with
chopped nuts and garnished with scented syrup … Just heaven! It is characteristic of the cuisines of the former Ottoman Empire, and is also found in Central and West Asia. There are many baklava variations. In Turkey, baklava is made with pistachios and served with kaymak (a creamy dairy product - similar to the English clotted cream - made from buffalos milk). In Greece we make baklava using walnuts or almonds, cloves and cinnamon. Although the history of baklava is not well documented, there is evidence that its current form was developed in the imperial kitchens of the Topkapı Palace in Istanbul but has its roots in ancient Greece, where they made the ‘gastrin’, a sweet very similar to the current baklava.
In Greek cuisine there is a very popular dessert category called "Siropiasta" (syrup desserts) which consists from extra syrupy cakes like portokalopita (orange syrup pie) and karidopita (walnut syrup pie) to kataifi, galaktoboureko (syrup custard pie)
and of course the famous traditional Greek baklava. The one thing
all these Greek desserts have in common is of course the scented syrup, which makes each one just irresistible!
Back in the days, around this time of the year, all the women of the family along with some friends were gathered in our tiny kitchen to make baklava for the upcoming holidays and catch up while baklava was in the oven. So this recipe - although it's a classic one - comes from my mom's cookbook.
This is a very easy to follow recipe to make the perfect homemade Baklava the traditional Greek way from scratch with little to no effort! It's the ultimate crowd pleaser dessert for your holiday table. So go ahead, give it a try and amaze everyone with your pastry skills!

BAKLAVA
12 servings
Preparation: 1 hour - Baking: 2 - 2 1/2 hours
INGREDIENTS
500 gr. phyllo dough
400 gr. butter, melted
1 tbsp ground cinnamon
1 tsp ground cloves
400 gr. walnuts (or 200 gr. walnuts and 200 gr. almonds)
50 gr. breadcrumbs
For the syrup
600 gr. granulated sugar
400 ml water
60 gr. corn syrup
1 cinnamon stick
3 whole cloves
1 orange cut in half
DIRECTIONS
We start with the syrup. Place a pot over high heat and add the sugar, water, corn syrup, cinnamon stick, cloves and orange. Bring the mixture to a boil and stir. As soon as the sugar melts, remove from heat and set aside to cool completely. It must be cool when poured over the hot baklava (make sure to discard orange halves before using). To make the filling, beat the walnuts, breadcrumbs, ground cinnamon and ground cloves in a food processor, until they are broken down but not finely grind. Transfer filling to a bowl.

Preheat oven to 150oC. Generously grease a 35x25 cm baking pan with butter. Position it in front of you so that the long side is directly in front of you. Begin spreading the phyllo dough in to the pan to create the bottom crust. Carefully spread the first sheet of phyllo dough in to the pan, making sure it covers 2/3 of the pan and letting the long ends hang over the edges of the pan. Gently press down on the phyllo with your hands to spread it out nicely all the way to the corners of the pan.

Repeat the same process with the second sheet of phyllo dough, only this time start spreading it on the other side of the pan, slightly covering the first sheet. Drizzle the phyllo with butter, DO NOT brush butter directly onto it. This will make the phyllo turn out much crunchier. Spread the third sheet of phyllo dough directly over the first two sheets, making it fit nicely in the pan all the way to the edges.Sprinkle about a handful of filling over them. Spread the fourth sheet of phyllo dough, directly in to the pan, just like the previous one, making sure it is covering the filling. Drizzle with butter. Sprinkle a handful of filling over it. Add another sheet of phyllo dough, placing the two top corners of the phyllo at the top corners of the pan and letting the other end hang over the pan, directly in front of you. Drizzle with butter. Sprinkle a handful of filling over it. Add another sheet of phyllo dough, this time placing the two top corners of the phyllo at the bottom corners of the pan, that are directly in front of you and letting the other end hang over the pan, which is away from you. Drizzle with butter. Sprinkle with another handful of filling over it.

Repeat the same process with all but 3 of the remaining sheets of phyllo dough, which will be used to make the top crust. Make sure you add all of the filling! Fold the overhanging ends of the phyllo over and drizzle with butter. Add 2 of the 3 remaining sheets of phyllo folded in half, to fit nicely and exactly in the pan without any ends hanging over. Drizzle each one with butter. Spread the final sheet nicely over the top, covering the whole pan. Carefully use your brush to tuck it in all around the sides of the baklava, creating a nice top layer. Add all of the remaining butter over the top and you can now brush it over the phyllo dough.

Refrigerate for 20 minutes to chill. When ready, remove and score the top with a sharp knife, creating diamond shaped pieces. Do not score all the way down. Bake for 2-2 ½ hours until golden and super crunchy.

When the baklava is ready, remove from oven and immediately pour the cooled syrup over it. Set it aside to soak up all of the syrup and cool (overnight it will be best). When ready, cut into pieces and serve.

We start with the syrup. Place a pot over high heat and add the sugar, water, corn syrup, cinnamon stick, cloves and orange. Bring the mixture to a boil and stir. As soon as the sugar melts, remove from heat and set aside to cool completely. It must be cool when poured over the hot baklava (make sure to discard orange halves before using). To make the filling, beat the walnuts, breadcrumbs, ground cinnamon and ground cloves in a food processor, until they are broken down but not finely grind. Transfer filling to a bowl.

Preheat oven to 150oC. Generously grease a 35x25 cm baking pan with butter. Position it in front of you so that the long side is directly in front of you. Begin spreading the phyllo dough in to the pan to create the bottom crust. Carefully spread the first sheet of phyllo dough in to the pan, making sure it covers 2/3 of the pan and letting the long ends hang over the edges of the pan. Gently press down on the phyllo with your hands to spread it out nicely all the way to the corners of the pan.

Repeat the same process with the second sheet of phyllo dough, only this time start spreading it on the other side of the pan, slightly covering the first sheet. Drizzle the phyllo with butter, DO NOT brush butter directly onto it. This will make the phyllo turn out much crunchier. Spread the third sheet of phyllo dough directly over the first two sheets, making it fit nicely in the pan all the way to the edges.Sprinkle about a handful of filling over them. Spread the fourth sheet of phyllo dough, directly in to the pan, just like the previous one, making sure it is covering the filling. Drizzle with butter. Sprinkle a handful of filling over it. Add another sheet of phyllo dough, placing the two top corners of the phyllo at the top corners of the pan and letting the other end hang over the pan, directly in front of you. Drizzle with butter. Sprinkle a handful of filling over it. Add another sheet of phyllo dough, this time placing the two top corners of the phyllo at the bottom corners of the pan, that are directly in front of you and letting the other end hang over the pan, which is away from you. Drizzle with butter. Sprinkle with another handful of filling over it.

Repeat the same process with all but 3 of the remaining sheets of phyllo dough, which will be used to make the top crust. Make sure you add all of the filling! Fold the overhanging ends of the phyllo over and drizzle with butter. Add 2 of the 3 remaining sheets of phyllo folded in half, to fit nicely and exactly in the pan without any ends hanging over. Drizzle each one with butter. Spread the final sheet nicely over the top, covering the whole pan. Carefully use your brush to tuck it in all around the sides of the baklava, creating a nice top layer. Add all of the remaining butter over the top and you can now brush it over the phyllo dough.

Refrigerate for 20 minutes to chill. When ready, remove and score the top with a sharp knife, creating diamond shaped pieces. Do not score all the way down. Bake for 2-2 ½ hours until golden and super crunchy.

When the baklava is ready, remove from oven and immediately pour the cooled syrup over it. Set it aside to soak up all of the syrup and cool (overnight it will be best). When ready, cut into pieces and serve.

(scroll down for English)
Η συνταγή αυτή έρχεται κατευθείαν από την Κύπρο. Λαχταριστές και θρεπτικές ταχινόπιτες, ιδανικές ως snack για το σχολείο ή το γραφείο. Αξίζει να τις δοκιμάσετε.

ΚΥΠΡΙΑΚΕΣ ΤΑΧΙΝΟΠΙΤΕΣ
Περίπου 6-8 κομμάτια
Προετοιμασία: 15 λεπτά - Αναμονή: 2 ώρες - Ψήσιμο: 35-40 λεπτά
ΥΛΙΚΑ
250 γρ. αλεύρι σκληρό
250 γρ. αλεύρι για όλες τις χρήσεις
140 γρ. αλεύρι που φουσκώνει μόνο του
1 φακελάκι μαγιά (9 γρ.)
100 γρ. ζάχαρη
1/2 κ.γ. μαστίχα
1/2 κ.γ. μαχλέπι
1 1/2 κ.σ. κανέλα
1 βανίλια
1 πρέζα αλάτι
150 - 200 ml χλιαρό νερό
1 κ.σ. βούτυρο
Για τη γέμιση
350 γρ. ταχίνι
200 γρ. ζάχαρη
1 1/2 κ.σ. κανέλα
ΕΚΤΕΛΕΣΗ
Σε ένα μπολ ρίχνουμε τη μαγιά, λίγη ζάχαρη, λίγο χλιαρό νερό και ανακατεύουμε καλά με ένα πιρούνι μέχρι να διαλυθεί η μαγιά. Αφήνουμε στην άκρη για 10 λεπτά μέχρι να ενεργοποιηθεί η μαγιά.
Στον κάδο του μίξερ ανακατεύουμε όλα τα αλεύρια, το αλάτι, τη ζάχαρη, την κανέλα, τη μαστίχα, τη βανίλια και το μαχλέπι. Κάνουμε μια λακουβίτσα στο κέντρο και ρίχνουμε το μείγμα της μαγιάς.
Ρίχνουμε λίγο λίγο το νερό. Χτυπάμε με τον γάντζο σε μέτρια προς δυνατή ταχύτητα για 7-8 λεπτά μέχρι να γίνει μια μαλακή ζύμη. Βάζουμε τη ζύμη σε ελαφρά λαδωμένο μπολ, τη σκεπάζουμε με μεμβράνη και την αφήνουμε να φουσκώσει για περίπου 1 1/2 ώρα σε ζεστό σημείο μέχρι να διπλασιαστεί ο όγκος της.
Εν τω μεταξύ, ετοιμάζουμε τη γέμιση ανακατεύοντας το ταχίνι, με τη ζάχαρη και την κανέλα.
Με τη βοήθεια ενός πλάστη, ανοίγουμε τη ζύμη σε μακρόστενες λωρίδες, αλείφουμε με τη γέμιση και τις τυλίγουμε σαν ρολό. Πατάμε αρχικά με την παλάμη μας και μετά με τον πλάστη πιέζοντας ώστε να φτιάξουμε μια στρογγυλή πίτα. Τοποθετούμε τις πίτες σε ταψί στρωμένο με λαδόκολλα και τις αφήνουμε να φουσκώσουν για 30 λεπτά περίπου.
Ψήνουμε σε προθερμασμένο φούρνο στους 150 βαθμούς μέχρι να ροδοκοκκινίσουν (περίπου 35-40 λεπτά).
Λιώνουμε το βούτυρο σε ένα κατσαρολάκι και αλείφουμε με πινέλο τις ταχινόπιτες μας όσο αυτές είναι ακόμα ζεστές.

The following recipe comes directly from the beautiful island of Cyprus. Delicious and nutricious tahini pies make the best snack for school or work. Give it a try, you will love them!

CYPRIOT TAHINI PIES
Makes 6-8 pieces
Preparation: 15 minutes - Waiting: 2 hours - Baking: 35-40 minutes
INGREDIENTS
250 gr. bread flour
250 gr. all purpose flour
140 gr. self-rising flour
1 packet active dry yeast (9 gr.)
100 gr. sugar
1/2 tsp mastic
1/2 tsp mahlab
1 1/2 tbsp ground cinnamon
1 packet vanilla powder
pinch of salt
150-200 ml lukewarm water
1 tbsp butter
For filling:
350 gr. tahini
200 gr. sugar
1 1/2 tbsp ground cinnamon
DIRECTIONS
Using a fork, combine the yeast, some sugar, a little lukewarm water until the yeast dissolves. Set aside for 10 minutes, to allow yeast to activate.
In a mixers bowl, add the flour, salt, sugar, cinnamon, mastic, vanilla and mahlab. Mix with a spoon and make a small well in the middle. Add the water (little by little), while beating on medium to high speed with the hook attachment. It should take about 7-8 minutes to create a nice, soft dough.
Transfer dough to a bowl lightly brushed with olive oil. Cover with plastic wrap and allow it to rise for about 1 1/2 in a warm place, until it doubles in size.
Meanwhile, prepare the filling by combining tahini, sugar and cinnamon.
When the dough is ready, roll it out into long strips. Brush with the filling and roll, lengthwise.
Press down to flatten it with your palm and then press down on it with a rolling pin to flatten it out further and create a round pie. Transfer pies to a baking pan lined with parchment paper and allow them to rest and rise for about 30 minutes.
Preheat oven to 150oC, bake for until golden brown (about 35-40 minutes).
When ready, remove from oven and brush them with melted butter while they are still warm.


Το γιουβέτσι είναι μια από τις αγαπημένες ελληνικές παραδοσιακές συνταγές και αποτελεί σίγουρα "comfort food". Πρόκειται ίσως για το απόλυτο "μαμαδίστικο" φαγητό, γεμάτο αρώματα που δύσκολα θα αφήσει αδιάφορους μικρούς και μεγάλους. Το φαγητό αυτό έχει τις ρίζες του στην οθωμανική κουζίνα. Στην Τουρκία μαγειρεύετε με αρνί ενώ στην Ελλάδα και την Κύπρο χρησιμοποιούμε μοσχάρι.

ΜΟΣΧΑΡΙ ΓΙΟΥΒΕΤΣΙ
4-6 άτομα
Προετοιμασία: 15 λεπτά - Μαγείρεμα: 2 ώρες & 15 λεπτά
ΥΛΙΚΑ
1200 γρ. μοσχαρίσιο μπούτι χωρίς κόκκαλο, κομμένο σε κύβους 1-2 εκ
3 μεγάλα κρεμμύδια, κομμένα σε λεπτές φέτες
2 καρότα, κομμένα σε φέτες πάχους 1 εκ.
1 κονσέρβα ψιλοκομμένη ντομάτα
2 κ.σ. πελτέ ντομάτας
150 ml κόκκινο κρασί
250 ml + 750 ml νερό
250 γρ. κριθαράκι μέτριο
1 κ.σ. ζάχαρη
¼ κ.γ. σπόρους κύμινου
2 ξυλάκια κανέλας
2 φύλλα δάφνης
ελαιόλαδο
αλάτι, πιπέρι
τριμμένη φέτα ή πεκορίνο για το σερβίρισμα
ΕΚΤΕΛΕΣΗ
Βάζουμε ελαιόλαδο σε μία κατσαρόλα σε δυνατή φωτιά και ρίχνουμε μέσα τα κρεμμύδια και τα καρότα. Ανακατεύουμε για 5 λεπτά μέχρι να μαλακώσουν και να καραμελώσουν. Αφαιρούμε τα λαχανικά και τα βάζουμε στην άκρη.
Επιστρέφουμε το τηγάνι στη φωτιά και βάζουμε τα κομμάτια από το κρέας μας μέσα και σοτάρουμε μέχρι να πάρει χρώμα. Όταν πάρει χρώμα, βάζουμε πίσω στην κατσαρόλα όλα τα λαχανικά και προσθέτουμε την κανέλα, τη δάφνη και το κύμινο. Στη συνέχεια βάζουμε τον πελτέ και σοτάρουμε για 2 λεπτά. Προσθέτουμε το κρασί και αφήνουμε να εξατμιστεί. Ρίχνουμε στη κατσαρόλα την ψιλοκομμένη ντομάτα, τη ζάχαρη και το νερό. Ανακατεύουμε και αλατοπιπερώνουμε. Σκεπάζουμε την κατσαρόλα και μαγειρεύουμε για περίπου 1 1/2 ώρα σε χαμηλή φωτιά.
Όταν το κρέας είναι έτοιμο, μεταφέρουμε σε ένα ταψί ή πυρέξ (μαζί με τα ζουμιά που υπάρχουν στην κατσαρόλα). Προθερμαίνουμε το φούρνο στους 180 βαθμούς, προσθέτουμε το κριθαράκι στο ταψί με το κρέας και 750 ml νερό. Σκεπάζουμε με αλουμινόχαρτο και ψήνουμε για 30 λεπτά. Αφαιρούμε το αλουμινόχαρτο, και συνεχίζουμε το ψήσιμο για 15 λεπτά ακόμα.
Όταν είναι έτοιμο, αποσύρουμε από τη φωτιά και αφήνουμε να κρυώσει. Σερβίρουμε με τριμμένη φέτα ή πεκορίνο.
Σημ.
1. Μπορούμε επίσης να το ψήσουμε στη γάστρα βάζοντας από την αρχή όλα τα υλικά εκτός από το κριθαράκι, χωρίς να χρειαστεί να φτιάξουμε τη σάλτσα στην κατσαρόλα. Επίσης, μπορούμε να μαγειρέψουμε το κρέας με τη σάλτσα στη χύτρα ταχύτητας, μειώνοντας έτσι τον απαιτούμενο χρόνο μαγειρέματος και να το "τελειώσουμε" στον φούρνο σύμφωνα με τη συνταγή.
2. Μπορούμε αντί για κριθαράκι να χρησιμοποιήσουμε κάποιο άλλο ζυμαρικό όπως βίδες, πένες, σπαγγέτι ή χυλοπίτες.

Giouvetsi is one of the most popular, traditional Greek comfort food recipes. It is full of flavors, which make it hard not to like it. Beef is slowly cooked in tomato sauce, then orzo is added and the dish is finished in the oven. It requires some time - you can cook it in the pressure cooker too (see tips below) - but the flavor is unique!

GIOUVETSI - OVEN BAKED BEEF AND ORZO CASSEROLE
4-6 Servings
Preparation: 15 minutes - Cooking: 2 hours & 15 minutes
INGREDIENTS
1200 gr. beef neck, cut in to 2 cm cubes
2-3 large onions, sliced
2 carrots, cut into 1 cm. slices
1 can chopped tomatoes
2 tbsp tomato paste
250 + 750 ml water
150 gr. red wine
250 g orzo, medium sized
1 tbsp sugar
¼ teaspoon ground cumin
olive oil, for sautéing
salt, pepper
2 cinnamon sticks
2 bay leaves
crumbled feta cheese or grated pekorino cheese for serving
DIRECTIONS
Place a pot over high heat and add 3 tbsp olive oil. Add onions and carrots and sauté until nicely caramelized (about 2 minutes). When ready, transfer to a bowl and set aside until needed.
Place pot back on heat and let it get very hot. Add some olive oil and the meat. Brown for 4-5 minute.
Add the sautéed vegetables, cinnamon sticks, bay leaves, cumin and tomato paste. Sauté for 1-2 minutes and add the wine. Let it evaporate. Add sugar, 250 ml water and chopped tomatoes and stir. Season with salt and pepper. Lower heat to low and simmer for 1 ½ hours, until the meat is very soft and the sauce has thickened (if your sauce is too thick, add a little more water).
When ready, transfer to an oven proof dish. Preheat oven to 180o C and add 750 ml water and orzo to the dish. Cover with aluminum foil and bake for 30 minutes. Remove foil and bake for another 15 minutes.
When ready, remove from oven. Let it rest of 10 minutes, sprinkle with cheese, serve and enjoy!
Just some notes
1. You can prepare Giouvetsi using a roaster. You just add all the ingredients in the roaster and at the end you add the orzo. A quicker way is to cook meat using a pressure cooker and then tranfer it to the baking dish and add orzo.
2. You can other kinds of pasta like noodles, penne or spaghetti.


(scroll down for English)
Ερώτηση: Ποιό είναι το πιο δημοφιλές ορεκτικό της Ελληνικής Κουζίνας;
Απαντήση: Το Τζατζίκι.
Ποιος δεν αγαπά το τζατζίκι, ακόμα και όταν ξέρεις ότι η κατανάλωσή του θα έχει επιπτώσεις στην ποιότητα της αναπνοής σου, είναι δύσκολο να του αντισταθείς. Πως είναι δυνατόν άλλωστε, αφού εκτός από βασικό συστατικό στο αγαπημένο μας σουβλάκι, αποτελεί το τέλειο συνοδευτικό για μια μεγάλη ποικιλία φαγητών όπως τα ψητά κρέατα, τα ψητά και τηγανητά λαχανικά, οι πεντανόστιμοι κεφτέδες λαχανικών (βλ. τοματοκεφτέδες, κολοκυθοκεφτέδες κλπ.) αλλά και για το ταπεινό φρέσκο χωριάτικο ψωμάκι.
Απαντήση: Το Τζατζίκι.
Ποιος δεν αγαπά το τζατζίκι, ακόμα και όταν ξέρεις ότι η κατανάλωσή του θα έχει επιπτώσεις στην ποιότητα της αναπνοής σου, είναι δύσκολο να του αντισταθείς. Πως είναι δυνατόν άλλωστε, αφού εκτός από βασικό συστατικό στο αγαπημένο μας σουβλάκι, αποτελεί το τέλειο συνοδευτικό για μια μεγάλη ποικιλία φαγητών όπως τα ψητά κρέατα, τα ψητά και τηγανητά λαχανικά, οι πεντανόστιμοι κεφτέδες λαχανικών (βλ. τοματοκεφτέδες, κολοκυθοκεφτέδες κλπ.) αλλά και για το ταπεινό φρέσκο χωριάτικο ψωμάκι.

ΤΖΑΤΖΙΚΙ
Προετοιμασία: 30 λεπτάΥΛΙΚΑ
500 γρ. γιαούρτι στραγγιστό
1 αγγούρι (περίπου 300 γρ.)
4 σκελίδες σκόρδο, πολτοποιημένες
1/4 φλ. ελαιόλαδο
1/4 φλ. ξύδι
3 κ.σ. άνηθος φρέσκος, ψιλοκομμένος
χυμός από 1/2 λεμόνι
αλάτι, πιπέρι
ελιές Καλαμών για το σερβίρισμα
ΕΚΤΕΛΕΣΗ
Πλένουμε και καθαρίζουμε το αγγούρι, αν θέλουμε μπορούμε να αφήσουμε και λίγη από την πράσινη φλούδα του. Το τρίβουμε στο χοντρό μέρος του τρίφτη, αλατίζουμε ελαφρώς, ανακατεύουμε και το αφήνουμε σε σουρωτήρι για 15 λεπτά, με ένα βάρος επάνω του για να βγάλει τα υγρά του.
Χρησιμοποιώντας τις παλάμες μας, στραγγίζουμε πολύ καλά το αγγούρι. Σε ένα μπόλ βάζουμε το γιαούρτι, το αγγούρι, τον άνηθο και το πολτοποιημένο σκόρδο. Προσθέτουμε το λάδι, το ξύδι και τον χυμό λεμονιού, αλατοπιπερώνουμε και ανακατεύουμε καλά. Δοκιμάζουμε και διορθώνουμε την γεύση. Τοποθετούμε το μπολ στο ψυγείο για να κρυώσει και σερβίρουμε γαρνίροντας με σταγόνες ελαιολάδου και ελιές Καλαμών.

Q: Name the most famous Greek appetizer.
A: Tzatziki.
There must be very few people that don't like tzatziki (my father is among them!). Even if you know that eating it will affect your breath quality, it's hard to resist. Besides being the key ingredient to souvlaki, tzatziki is the perfect dip for a wide variety of foods such as grilled meats, grilled and fried vegetables, delicious vegetable fritters (tomato fritters, zucchini fritters etc.) or some fresh rustic bread.
Making tzatziki at home is easy and it tastes 100 times better than the store-bought. Here's the recipe.
A: Tzatziki.
There must be very few people that don't like tzatziki (my father is among them!). Even if you know that eating it will affect your breath quality, it's hard to resist. Besides being the key ingredient to souvlaki, tzatziki is the perfect dip for a wide variety of foods such as grilled meats, grilled and fried vegetables, delicious vegetable fritters (tomato fritters, zucchini fritters etc.) or some fresh rustic bread.
Making tzatziki at home is easy and it tastes 100 times better than the store-bought. Here's the recipe.

TZATZIKI
Preparation: 30 minutesINGREDIENTS
500 gr. Greek yoghurt (full fat)
1 cucumber (about 300 gr.)
4 cloves garlic, crushed
1/4 cup olive oil
1/4 cup vinegar
3 tbsp fresh dill, chopped
juice of 1/2 lemon
salt, pepper
Kalamata olives for serving
DIRECTIONS
Wash and clean the cucumber, you can leave some of the green rind if you want. Grate it, using the thick part of the grater, lightly salt and leave in a colander for about 15 minutes, putting some kind of a weight on top, to drain its liquids.
Using your palms, squeeze cucumber. In a bowl add yogurt, cucumber, dill and crushed garlic. Add olive oil, vinegar, lemon juice, salt and pepper and mix well. Taste and correct it according to your taste. Place the bowl in the refrigerator to cool for a while, garnished with some olive oil drops and Kalamata olives.


Δεν υπάρχει ελληνικό σπίτι που να μην ψήνει μουσακά το καλοκαίρι, και δεν υπάρχει ξένος επισκέπτης από οποιοδήποτε μέρος του κόσμου που να μη γνωρίζει αυτό το φαγητό. Ο μουσακάς είναι ένα από τα δημοφιλέστερα πιάτα της χώρας μας, που αν και όχι αμιγώς ελληνικής καταγωγής, αποτελεί ένα από τα χαρακτηριστικα πιάτα της παραδοσιακής ελληνικής κουζίνας.
Δεν θα σας πω ψέματα αφού όσοι καταπιάνονται με την παρασκευή αυτού του φαγητού του γνωρίζουν καλά, ο μουσακάς είναι ένα μπελαλίδικο φαγητό και θέλει πολύ θάρρος για να τον φτιάξεις αφού δεν θα ταλαιπωρηθείς μόνο στην προετοιμασία, αλλά και στο καθάρισμα της κουζίνας καθώς απαιτεί πολλά σκεύη. Η νοστιμιά όμως που προσφέρει, σίγουρα σε ανταμοίβει.
Δεν θα σας πω ψέματα αφού όσοι καταπιάνονται με την παρασκευή αυτού του φαγητού του γνωρίζουν καλά, ο μουσακάς είναι ένα μπελαλίδικο φαγητό και θέλει πολύ θάρρος για να τον φτιάξεις αφού δεν θα ταλαιπωρηθείς μόνο στην προετοιμασία, αλλά και στο καθάρισμα της κουζίνας καθώς απαιτεί πολλά σκεύη. Η νοστιμιά όμως που προσφέρει, σίγουρα σε ανταμοίβει.
Τα μυστικά για ένα νόστιμο μουσακά είναι πολλά, πρώτα από όλα η μελιτζάνα, η οποία δεν θα πρέπει να έχει απορροφήσει πολύ λάδι αλλά και να έχει ξεπικρύσει καλά. Για τον λόγο αυτό, δεν τηγανίζω τα λαχανικά αλλά τα ψήνω στον φούρνο. Ακολούθως, τα μπαχαρικά στον κιμά παίζουν πολύ σπουδαίο ρόλο, συνεπώς καλό είναι να μην τα παραλείψετε.
Οφείλω βέβαια να παραδεχτώ ότι ο καλύτερος μουσακάς που έχω φάει ποτέ, ήταν στο Καμάρι της Σαντορίνης στην ταβέρνα της Ειρήνης, με λευκές μελιτζάνες και άνυδρες ντομάτες, σερβιρισμένος σε ατομικό πύλινο σκεύος.
Οφείλω βέβαια να παραδεχτώ ότι ο καλύτερος μουσακάς που έχω φάει ποτέ, ήταν στο Καμάρι της Σαντορίνης στην ταβέρνα της Ειρήνης, με λευκές μελιτζάνες και άνυδρες ντομάτες, σερβιρισμένος σε ατομικό πύλινο σκεύος.

ΜΟΥΣΑΚΑΣ
6 άτομαΠροετοιμασία: 1 ώρα - Ψήσιμο: 30-40 λεπτά
ΥΛΙΚΑ
3 μεγάλες πατάτες, κομμένες σε λεπτές ροδέλες (πάχους περίπου 1 εκ.)
ελαιόλαδο
2 μελιτζάνες, φλάσκες κομμένες σε λεπτές ροδέλες (πάχους περίπου 1 εκ.)
θυμάρι
αλάτι, πιπέρι
Για τον κιμά
1 κρεμμύδι
ελαιόλαδο, για το σοτάρισμα
1 σκ. σκόρδο
2-3 κ.σ. ζάχαρη
1 κ.σ. μοσχοκάρυδο
½ κ.γλ. κανέλα
1 κ.σ. πελτέ ντομάτας
500 γρ. μοσχαρίσιο κιμά
1 κονσέρβα ντομάτα κονκασέ
αλάτι, πιπέρι
Για τη μπεσαμέλ
100 γρ. βούτυρο
100 αλεύρι για όλες τις χρήσεις
750 ml γάλα πλήρες
πιπέρι
1 πρέζα μοσχοκάρυδο
100 γρ. τριμμένη παρμεζάνα
2 αυγά
ΕΚΤΕΛΕΣΗ
Ξεκινάμε με την προετοιμασία των λαχανικών. Τοποθετούμε τις ροδέλες μελιτζάνας σε ένα σουρωτήρι και τις πασπαλίζουμε με μπόλικο αλάτι προκειμένου να τις ξεπικρύσουμε. Τις αφήνουμε για περίπου 20 λεπτά.
Στρώνουμε με αντικολλητικό χαρτί ένα μεγάλο ταψί και απλώνουμε τις ροδέλες πατάτες. Ραντίζουμε με ελαιόλαδο και αλατοπιπερώνουμε. Ψήνουμε στο γκριλ στους 200οC, μέχρι να ροδίσουν ελαφρά και από τις δύο πλευρές. Μεταφέρουμε τις πατάτες σε μια πιατέλα.
Ξεπλένουμε τις μελιτζάνες με μπόλικο νερό και τις απλώνουμε στο ταψί που ψήσαμε τις πατάτες. Ραντίζουμε με ελαιόλαδο, αλατοπιπερώνουμε και πασπαλίζουμε με θυμάρι. Ψήνουμε στο γκρίλ στους 200οC βαθμούς, μέχρι να ροδίσουν καλά και από τις δύο πλευρές. Μεταφέρουμε σε πιατέλα.
Για τον κιμά, ψιλοκόβουμε το κρεμμύδι και το σωτάρουμε με λίγο ελαιόλαδο σε δυνατή φωτιά. Προσθέτουμε το ψιλοκομμένο σκόρδο και τον κιμά και ανακατεύουμε μέχρι να καραμελώσει. Προσθέτουμε τη ζάχαρη, τα μπαχαρικά και τον πελτέ. Σβήνουμε με την ντομάτα, ανακατεύουμε καλά και αφήνουμε τη σάλτσα να δέσει σε χαμηλή θερμοκρασία για 10-15 λεπτά, φροντίζοντας να ανακατεύουμε τακτικά.
Σε ένα κατσαρολάκι σε χαμηλή φωτιά, προσθέτουμε το βούτυρο. Μόλις λιώσει ρίχνουμε το αλεύρι και ανακατεύουμε με το σύρμα. Προσθέτουμε το γάλα, λίγο-λίγο και ανακατεύουμε συνεχώς ώστε να μην σβολιάσει. Μόλις η πρώτη δόση γάλακτος απορροφηθεί, τότε προσθέτουμε την επόμενη μέχρι να προσθέσουμε όλο το γάλα. Μόλις η κρέμα αρχίσει να βγάζει φουσκάλες, είναι έτοιμη. Αποσύρουμε από τη φωτιά και προσθέτουμε πιπέρι, τριμμένο μοσχοκάρυδο, λίγη παρμεζάνα, τα αυγά και ανακατεύουμε καλά. Αφήνουμε στην άκρη.
Βουτυρώνουμε ένα αντικολλητικό σκεύος φούρνου και στρώνουμε πρώτα τις πατάτες και από πάνω τις μελιτζάνες. Ρίχνουμε περίπου το 1/3 απο την μπεσαμέλ στο μείγμα του κιμά ώστε να κρατηθούν όλα τα υλικά του μουσακά μας ενωμένα και στρώνουμε τον κιμά στο σκεύος. Τέλος προσθέτουμε την μπεσαμέλ - προσέχουμε να την απλώσουμε καλά σε όλο το ταψί - και πασπαλίζουμε με τριμμένη παρμεζάνα.
Ψήνουμε στον φούρνο, στους 200οC στον αέρα για 30-40 λεπτά μέχρι να πάρει χρυσαφί χρώμα.
Αφαιρούμε από τον φούρνο και αφήνουμε να κρυώσει καλά για 1 ώρα. Κόβουμε σε κομάτια και σερβίρουμε.

Mousakas is one of the most popular Greek dishes and although its origin isn't purely Greek, is considered one of Greece's tranditional dishes. In case you are not familiar with this dish, let me tell you this: Imagine layers of juicy minced beef, sweet eggplants, potato slices and creamy béchamel sauce baked to perfection!
I'm not going to lie, as everybody who ever cook this dish knows. Mousakas, is a highly demanding dish. The preparation is time consuming and after you put it in the oven, your kitchen will be a disaster zone. A lot of pans and dishes are involved in the process and the cleaning afterwards isn't a happy task. But its so delicious that worths the effort.
I'm not going to lie, as everybody who ever cook this dish knows. Mousakas, is a highly demanding dish. The preparation is time consuming and after you put it in the oven, your kitchen will be a disaster zone. A lot of pans and dishes are involved in the process and the cleaning afterwards isn't a happy task. But its so delicious that worths the effort.
There are many secrets for the perfect mousaka. First of all, the eggplants, have to be light and not oily and of course not bitter. The original recipe calls for frying the vegetable slices but I found out that grilling makes the vegetables less oily and with less calories and the taste result is the same. Also, spicing the ground beef plays a huge part in this recipe so don't skip it.
At this point, I have to admit that the best mousaka I'd ever eaten in my life was in Santorini, in Irini's Tavern made with white eggplants and local tomatoes, served in a cute baking dish.

Preparation: 1 hour - Cooking: 30-40 minutes
INGREDIENTS
3 potatoes, cut into thin slices (about 1 cm)
2 eggplants, cut into thin slices (about 1 cm)
olive oil
salt, ground pepper
thyme
For the meat
olive oil
1 onion, minced
1 clove of garlic, minced
500 gr ground beef
salt, ground pepper
½ tsp cinnamon
pinch of nutmeg
1 tbsp tomato paste
1 can chopped tomatoes
For the béchamel sauce
750 ml milk, full fat
2 eggs
100 gr all-purpose flour
100 gr butter
ground pepper
pinch of nutmeg
100 gr grated parmesan cheese
DIRECTIONS
Start by preparing the vegetables. Put eggplant slices in a colander and sprinkle with plenty of salt to shed the bitterness. Leave them for about 20 minutes.
Cover with greaseproof paper a large baking pan and arrange the potato slices. Drizzle with olive oil and season with salt and pepper. Grill them at 200oC until lightly browned on both sides. Transfer potatoes to a platter.
Rinse the eggplant with plenty of water and arrange them in the baking pan that you grill the potatoes. Drizzle with olive oil, salt and pepper and sprinkle with thyme. Grill at 200oC until lightly browned on both sides. Transfer to platter.
For the ground beef, pour a small amount of olive oil into a pan. Mince an onion and add it to the pan, caramelize over high heat. Add the minced garlic and meat and mix. Sauté until it softens and turns slightly golden. Add the spices and the tomato paste, sauté and season with salt and pepper over high heat. Add the chopped tomatoes and cook for 5-10 minutes or until most of the liquid evaporates. Set aside.
Place a medium sized saucepan over medium heat. Add the butter and as soon as the butter starts to melt add the flour and start to whisk as you sauté. Start to add the milk slowly in batches. Whisk continuously throughout this process so no lumps form in the mixture. As soon as the first batch of milk is absorbed in the flour, you can add the next batch. Repeat process until all of the milk has been added and completely incorporated in the mixture. When the sauce starts to bubble, it’s ready. Remove from heat, add some freshly ground pepper, ground nutmeg, some grated parmesan cheese and eggs. Stir and set aside.
You are ready to assemble. Brush a baking dish with olive oil and spread potato slices in a single layer on the bottom. Continue with the eggplant slices in a single layer. Add 1/3 of the béchamel sauce to the ground beef mixture and mix together to create a sticky filling that will hold the dish together when serving. Spread beef mixture over the vegetable layers and pour over béchamel sauce. Use a spatula to smooth the top and sprinkle with some grated parmesan cheese.
Bake for 30-40 minutes or until golden brown. Remove from oven and allow to cool for at least 1 hour before cutting into pieces. Serve and enjoy!
At this point, I have to admit that the best mousaka I'd ever eaten in my life was in Santorini, in Irini's Tavern made with white eggplants and local tomatoes, served in a cute baking dish.
MOUSSAKAS
6 servingsPreparation: 1 hour - Cooking: 30-40 minutes
INGREDIENTS
3 potatoes, cut into thin slices (about 1 cm)
2 eggplants, cut into thin slices (about 1 cm)
olive oil
salt, ground pepper
thyme
For the meat
olive oil
1 onion, minced
1 clove of garlic, minced
500 gr ground beef
salt, ground pepper
½ tsp cinnamon
pinch of nutmeg
1 tbsp tomato paste
1 can chopped tomatoes
For the béchamel sauce
750 ml milk, full fat
2 eggs
100 gr all-purpose flour
100 gr butter
ground pepper
pinch of nutmeg
100 gr grated parmesan cheese
DIRECTIONS
Start by preparing the vegetables. Put eggplant slices in a colander and sprinkle with plenty of salt to shed the bitterness. Leave them for about 20 minutes.
Cover with greaseproof paper a large baking pan and arrange the potato slices. Drizzle with olive oil and season with salt and pepper. Grill them at 200oC until lightly browned on both sides. Transfer potatoes to a platter.
Rinse the eggplant with plenty of water and arrange them in the baking pan that you grill the potatoes. Drizzle with olive oil, salt and pepper and sprinkle with thyme. Grill at 200oC until lightly browned on both sides. Transfer to platter.
For the ground beef, pour a small amount of olive oil into a pan. Mince an onion and add it to the pan, caramelize over high heat. Add the minced garlic and meat and mix. Sauté until it softens and turns slightly golden. Add the spices and the tomato paste, sauté and season with salt and pepper over high heat. Add the chopped tomatoes and cook for 5-10 minutes or until most of the liquid evaporates. Set aside.
Place a medium sized saucepan over medium heat. Add the butter and as soon as the butter starts to melt add the flour and start to whisk as you sauté. Start to add the milk slowly in batches. Whisk continuously throughout this process so no lumps form in the mixture. As soon as the first batch of milk is absorbed in the flour, you can add the next batch. Repeat process until all of the milk has been added and completely incorporated in the mixture. When the sauce starts to bubble, it’s ready. Remove from heat, add some freshly ground pepper, ground nutmeg, some grated parmesan cheese and eggs. Stir and set aside.
You are ready to assemble. Brush a baking dish with olive oil and spread potato slices in a single layer on the bottom. Continue with the eggplant slices in a single layer. Add 1/3 of the béchamel sauce to the ground beef mixture and mix together to create a sticky filling that will hold the dish together when serving. Spread beef mixture over the vegetable layers and pour over béchamel sauce. Use a spatula to smooth the top and sprinkle with some grated parmesan cheese.
Bake for 30-40 minutes or until golden brown. Remove from oven and allow to cool for at least 1 hour before cutting into pieces. Serve and enjoy!


Μόνο όταν δοκιμάσει κανείς ντόπιες ελληνικές γαρίδες, μπορεί να συνειδητοποιήσει πόσο απέχουν - γευστικά - από τις υπόλοιπες. Έτσι λοιπόν, όταν τις προάλλες ένα φιλικό μας ζευγάρι είχε την ευγενική καλοσύνη να μας στείλει μερικές φρέσκες (από την Πρέβεζα παρακαλώ!), χάρηκα πάρα πολύ. Ήταν η κατάλληλη ευκαιρία να φτιάξω "Γαρίδες Σαγανάκι" που τόσο πολύ είχαμε επιθυμήσει.
Τη συγκεκριμένη συνταγή την φτιάχνω μόνο όταν βρω νόστιμες φρέσκες γαρίδες.

ΓΑΡΙΔΕΣ ΣΑΓΑΝΑΚΙ ΜΕ ΦΕΤΑ
4 άτομαΠροετοιμασία: 15 λεπτά - Μαγείρεμα: 20 λεπτά
ΥΛΙΚΑ
12 γαρίδες, μεγάλες
2 φλ. ψιλοκομμένες ντομάτες φρέσκες (ή 1 κονσέρβα)
2 φρέσκα κρεμμυδάκια, ψιλοκομμένα
1 ξερό κρεμμύδι, ψιλοκομμένο
3 κ.σ. ελαιόλαδο
1/4 φλ. ούζο
1 πρέζα ζάχαρη
2 κ.σ. ψιλοκομμένος μαϊντανός
150 γρ. τυρί φέτα, τρίμμα
αλάτι, φρεσκοτριμμένο πιπέρι
ΕΚΤΕΛΕΣΗ
Καθαρίζουμε το σώμα από τις γαρίδες (κρατώντας τα κεφάλια πάνω στο σώμα) και αφαιρούμε το μαύρο έντερο.
Σε ένα τηγάνι ζεσταίνουμε το ελαιόλαδο. Αλατοπιπερώνουμε τις γαρίδες και τις ροδίζουμε στο ελαιόλαδο για 1 λεπτό από κάθε πλευρά. Προσθέτουμε το ξερό κρεμμύδι και τα φρέσκα κρεμμυδάκια. Αφήνουμε να σοταριστούν για 3-4 λεπτά και σβήνουμε με το ούζο. Βγάζουμε τις γαρίδες σε ένα πιάτο για να μην παραβράσουν και προσθέτουμε στη σάλτσα την ντομάτα, τη ζάχαρη και τον ψιλοκομμένο μαϊντανό. Βράζουμε τη σάλτσα για περίπου 6-7 λεπτά σε δυνατή φωτιά μέχρι να μελώσει.
Μεταφέρουμε τη σάλτσα σε ένα πυρίμαχο σκεύος και προσθέτουμε τις γαρίδες, ανακατεύουμε απαλά και πασπαλίζουμε με τη φέτα. Ψήνουμε σε προθερμασμένο φούρνο στους 180οC, για περίπου 5-7 λεπτά, μέχρι να ροδίσει το τυρί.
Συνοδεύουμε με ρύζι και ζεστό τραγανό ψωμί (για βουτιές στη σάλτσα) και σερβίρουμε αμέσως.

The other day, some friends sent us over some fresh shrimps from Preveza. In case you didn't know, some of the most delicious shrimps come from Preveza waters. It's hard to find them unless you have friends there or you know the fisherman.
So it was the best excuse for some "Shrimp Saganaki". You see, there are some recipes that I make only if I've found the best ingredients. This recipe goes in this category.

SHRIMP SAGANAKI WITH FETA CHEESE
4 servingsPreparation: 15 minutes - Cooking: 20 minutes
INGREDIENTS
12 shrimp, large size
2 cups chopped fresh tomatoes (or 1 can)
2 fresh green onions, chopped
1 red onion, chopped
3 tbsp olive oil
1/4 cup Ouzo
1 pinch sugar
2 tbsp parsley, chopped
150 gr. feta cheese, crumbled
salt, freshly ground pepper
DIRECTIONS
Start by cleaning and peeling the shrimps (make sure to keep the head on the shrimp body).
In a skillet, heat the olive oil. Salt and pepper shrimps and sauté them for 1 minute on each side. Add the onions. Allow them to cook for 3-4 minutes and add the ouzo. Remove the shrimps to avoid overcooking them and add into the skillet the tomatoes, sugar and parsley. Boil the sauce for 6-7 minutes over high heat until thickens.
Transfer the sauce to a baking dish, add the shrimps, stir gently and sprinkle with feta cheese. Bake in preheated oven at 180oC for about 5-7 minutes, until browned cheese.
Serve immediately with rice and fresh crispy bread (for sauce dipping).


(scroll down for English)
Τι είναι αυτό που υπάρχει στο ψυγείο κάθε ελληνικού σπιτιού; Γλυκό κουταλιού!!! Και πιθανότατα όχι μόνο ένα αλλά ποικιλία. Πάρτε για παράδειγμα το δικό μου. Αυτή την στιγμή στο ψυγείο μου υπάρχουν 5 διαφορετικά γλυκά κουταλιού. Κυδώνι, λεμόνι, πορτοκάλι, ντοματάκι και ελιά (εάν δεν το ξέρετε η ελιά Καλαμών γίνεται πεντανόστιμο γλυκό του κουταλιού). Όλα σπιτικά εκτός από την ελιά, η οποία είναι από την σειρά Navarino Icons (δοκιμάστε την και δεν θα το πιστεύετε!).
Ποτέ στο παρελθόν δεν είχα καταπιαστεί με τα γλυκά κουταλιού. Για να πω την αλήθεια, τα φοβόμουν. Οι πιθανότητες αποτυχίας είναι αρκετά υψηλές, λίγο τα φρούτα, λίγο το σιρόπι και ο κόπος πάει χαμένος. Όλα αυτά μέχρι που ανακάλυψα αυτή την πανεύκολη συνταγή για γλυκό κουταλιού πορτοκάλι. Πρόκειται για γλυκό με ολόκληρες φέτες πορτοκαλιού ψημένο στον φούρνο! Πείραξα λιγάκι την αρχική συνταγή και κατέληξα σε αυτή εδώ, η οποία ξετρέλανε όποιον την δοκίμασε.

ΓΛΥΚΟ ΚΟΥΤΑΛΙΟΥ ΠΟΡΤΟΚΑΛΙ
Περίπου 1,5 κιλά
Προετοιμασία: 35-45 λεπτά - Ψήσιμο: 1 ώρα
ΥΛΙΚΑ
4 πορτοκάλια, ακέρωτα
1 κιλό ζάχαρη λευκή
1 κ.γλ. εκχύλισμα βανίλιας ή 1 βανίλια
χυμός από 1 πορτοκάλι
χυμός από 1 λεμόνι
ΕΚΤΕΛΕΣΗ
Πλένουμε καλά τα πορτοκάλια και ξύνουμε λίγη από τη φλούδα τους (το ξύσμα δεν το πετάμε, το κρατάμε για μελλοντική χρήση). Βάζουμε τα πορτοκάλια σε μια κατσαρόλα και προσθέτουμε τόσο νερό όσο να τα καλύπτει. Τα βράζουμε για 7-8 λεπτά (από το σημείο βρασμού), τα στραγγίζουμε, αλλάζουμε το νερό και επαναλαμβάνουμε τη διαδικασία 3-4 φορές (ανάλογα πόσο γλυκά είναι τα πορτοκάλια, τα δικά μου ήταν αρκετά γλυκά και έκανα τη διαδικασία 3 φορές). Με αυτό τον τρόπο τα πορτοκάλια μας θα ξεπικρίσουν.
Αφήνουμε τα πορτοκάλια στην άκρη να κρυώσουν και τα κόβουμε σε χοντρές φέτες (πάχους 1 εκ.). Τοποθετούμε τις φέτες σε ένα ταψί την μια δίπλα στην άλλη.
Σε ένα μπολ ανακατεύουμε πολύ καλά τη ζάχαρη, το χυμό πορτοκαλιού και λεμονιού και τη βανίλια και απλώνουμε το μείγμα πάνω από τις φέτες πορτοκαλιού. Σκεπάζουμε με αντικολλητικό χαρτί και ψήνουμε σε προθερμασμένο φούρνο στους 180oC για 1 ώρα.
Αποσύρουμε από το φούρνο, αφήνουμε να κρυώσουν για 10 λεπτά περίπου και μεταφέρουμε το γλυκό με το σιρόπι σε αποστειρωμένα βάζα. Όταν το γλυκό κρυώσει εντελώς, αποθηκεύουμε τα βάζα στο ψυγείο.
Σημ.
1. Μπορείτε να ψιλοκόψετε το γλυκό και να το προσθέσετε σε κέικ ή στο γιαούρτι.
2. Το σιρόπι που τυχόν περισσέψει μπορεί να συνοδεψει παγωτό, τηγανήτες, κρέπες ή οτιδήποτε άλλο φανταστείτε.

Do you know what you can find in every Greek family fridge all year long, besides feta cheese? Spoon sweets (Glyka koutaliou in greek)!!! Probably a variety of them. Take mine for example. Right now you are having 5 different spoon sweets. Quince, lemon, orange, cherry tomatoes and Kalamata olive (it's unbelievable until you try it, Kalamata olives make delicious spoon sweets). Everything is homemade - by family and friends - except the Kalamata olive one, which I buy from the deli shop (my favorite by far is from Navarino Icons Delicasies).
Spoon sweets are sweet preserves, served in a spoon as a gesture of hospitality in Greece, Cyprus, the Balkans, parts of the Middle East and Russia. They are usually offered to guests served by the teaspoon in a small porcelain or crystal glass dish or bowl, with coffee or tea and cold water. Most of the time they are homemade but nowadays they can also be easily found in most groceries stores. You can use them as ice cream or yogurt topping, or even as a spread on toast for breakfast. They can be made from almost any fruit, seedless grapes, various berries, bergamot, apricots, apples, pears, sour and sweet cherries, oranges, kumquats, lemons, grapefruit, tangerines, pomegranates, quinces, figs, prunes, etc. Even soft fruit like melon and watermelon can make delicious spoon sweets, by making them firm first. Other varieties include green, unripe walnuts, pistachios, hazelnuts, and other nuts and even flower petals like rose. As you can see almost everything can be made into sweet, flavorful preserves even vegetables like baby eggplants or cherry tomatoes. The overall method of preparation is essentially the same as that of marmalade, except that fruit pieces remain firm and whole (a well-made spoon sweet is chewy).
Never before I have tried to make spoon sweets. To be honest, I was scared of making them. The chances of failure were high since a lot could go wrong such as the fruits not being sweet enough, or the syrup. All of these until I found this recipe and decided to give it a try. I even played around the original recipe and came up with my own. Give it a try, it's amazing how easy and delicious this dessert is.

ORANGE SPOON SWEET
Makes about 1,5 kilos
Preparation: 35-45 minutes - Baking: 1 hour
INGREDIENTS
4 oranges
1 kilo white sugar
1 tsp vanilla extract
juice of 1 lemon
juice of 1 orange
DIRECTIONS
Wash the oranges and scrape some of the skin (don't throw away zest, keep it for future use). Place the oranges in a saucepan, cover with water and bring to boil. Boil for 7-8 minutes (counting from the boiling point), drain, change the water and repeat the process for 3-4 times (depending on how sweet the oranges are - mine were pretty sweet and I did it 3 times). Making this, we remove the bitterness from the oranges.
Let oranges aside to cool and cut into thick slices (about 1 cm). Arrange the slices, side by side, on a baking tray.
In a bowl, whisk together sugar, orange and lemon juice and vanilla and spread the mixture over the orange slices. Cover with non-stick paper and bake in a preheated oven at 180oC for 1 hour.
Remove from heat, let cool for about 10 minutes and transfer the slices with the syrup into sterilized jars. When the sweets are cooled completely, store the jars in the refrigerator.
Just some notes
1. You can chop the sweet orange slices and add them to your cake or yogurt.
2. You can use syrup as topping on ice cream, crepes, pancakes or whatever you want.


